Welcome to ProfitSystem®, the premiere Windows-based POS system for bridal shops, special occasion retailers and formalwear rental stores from BBL Systems Inc., the makers of The Bridal Profit System. These instructions are for our customers who are renting the ProfitSystem month to month accessing the software via the internet.
Overview
The ProfitSystem has complete on-line HELP. Once logged on, from the WinPOS Main Menu press F1 or select HELP from the TOP menu. The link to the online Manual/Help system is: ProfitSystem Help Please review the Getting Started Topic: Getting Started
Please review the Chapter Getting Started, particularly the topic within that chapter called Getting Started with ProfitSystem. Please eMail or call with setup, conversion and operational questions, we want to help. 800-587-7277 x 303 or sne email to [email protected]
Getting Started
Step 1
You will be accessing the ProfitSystem software via the internet using a Microsoft program call Remote Desktop Connection (RDC). All Windows operating systems include the RDC program. Apple Macs must first downloadd and installed RDC from the Apple iTunes store.
Step 2
Start the Microsoft Remote Desktop Connection (RDC) Client software on your system. You may wish to create a shortcut on your system’s desktop tor the RDC program fast & easy access.
For Apple Macs please download and install the Microsoft RDC program from this link:
https://itunes.apple.com/us/app/microsoft-remote-desktop/id715768417?mt=12
On MS Windows computers You may have to SEARCH for the RDC client if you have trouble locating it on your computer. Open up the Windows Start menu and type in RDC or RDP or Remote Desktop to find the program. Once found, click it to start it.
Step 3
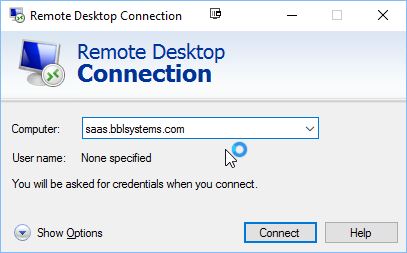
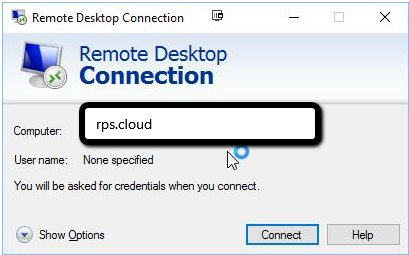
Once the RDP client is started a Computer select screen appears and will look similar to this
Step 4
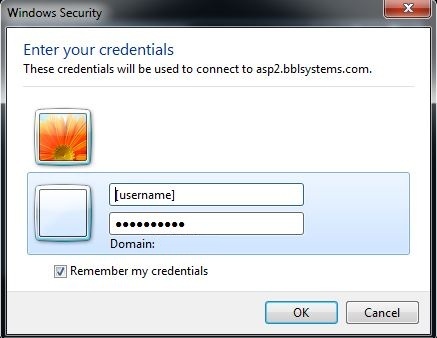
Enter saas.bblsystems.com or rps.cloud (URL provided in your welcome email message) for the computer and click Connect. A login screen will appear next:
Step 5
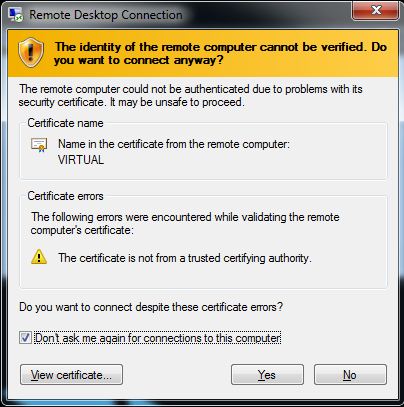
Enter your username and password, provided in our welcome email. Click Ok You may see the following Alert message. Check the “Don’t ask me again…” line and click YES.
Step 6
Starting the application for the first time for NEW USERS
The first screen that may appear will be the Open Store screen. This will appear on each new day. It needs the business date (normally the current actual date) and the SA ID of the person opening the store.
The Business Date will be the current date of the computer.
The default pre entered user within the ProfitSystem is a user called MANAGER. Until you have an opportunity to create more USERS in the ProfitSystem simply enter the MANAGER user anytime you are prompted for a user name or SA ID. Since this is the first time you are running WinPOS, use the MANAGER sales associate ID as ther user opening the store.
Click OPEN STORE.
Printers
Ability to PRINT depends on the computer and printer type you are using to access ProfitSystem Online. Many times printing will just work, but often you may need to contact BBL Support for help to get printing functioning properly.
To see if printing will function on your computer without help follow these steps. From the main switchboard, select Setup-> General Setup-> Printers. This will display the Printers dialog.
If you get a message indicating “You have no printers defined. WinPOS will be unable to print” please contact customer service about your printer.
Please provide BBL Support the following information:
Which Microsoft Windows version is installed on your computer (XP, Win7 or Win8)
Is it 32 bit or 64 bit
Who is the manufacturer of your printer and it’s exact model number
If under the “current printers” heading you see printer names, followed by session numbers, your printing should function.
Please review the manual or online HELP for detailed operating instructions.
To obtain detailed instructions on ProfitSystem Online simply open any browser on your local computer and click this URL:
Please bookmark it and/or add a shortcut to it on your desktop.
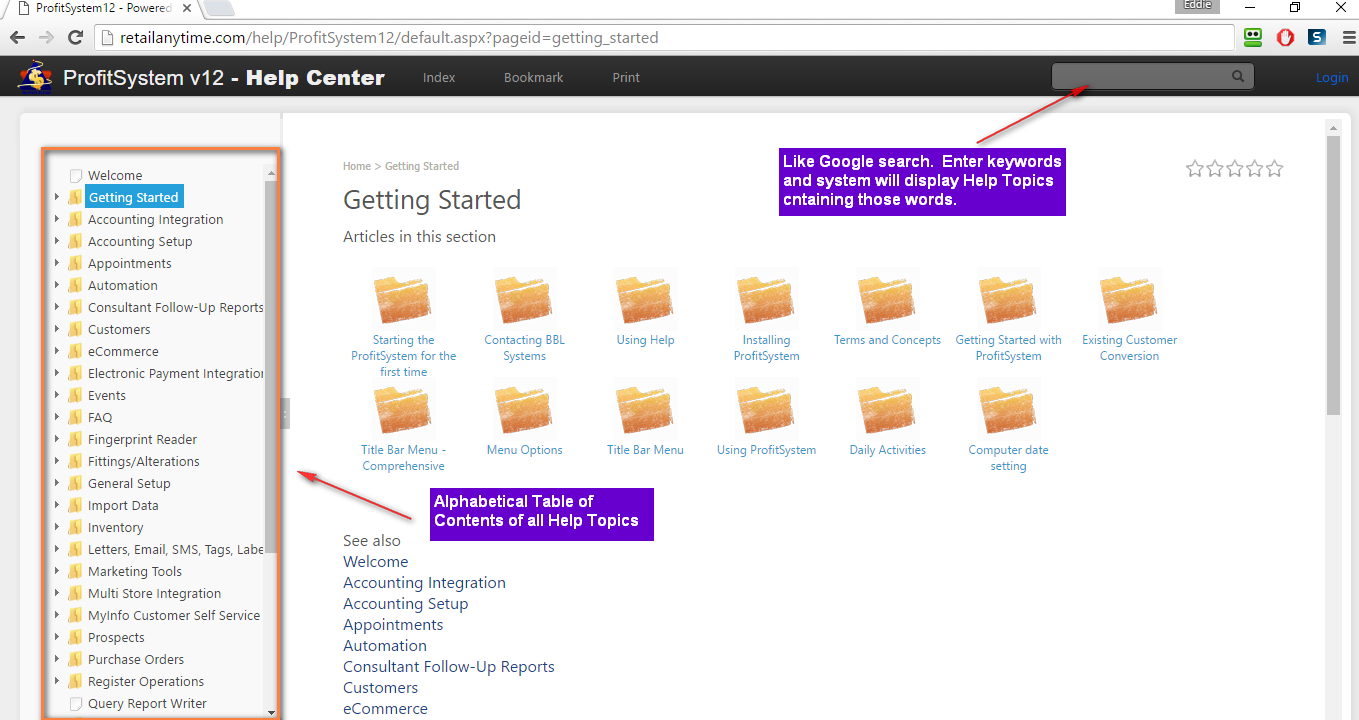
Please initially focus on the Getting Started Chapter which provides detail setup steps!
Also are training videos that cover many aspects of the ProfitSystem. Menus screens appear differently in the varying versions of the ProfitSystem, but the data forms are the same. Click the Video link for direct access to the videos.
Video Link: Training Videos
At the minimum, you’ll have to perform the following steps before using WinPOS:
- Configure basic settings in System/Store Setup, at Main->Housekeeping->General Setup->System/Store Setup. Required.
- Add all your employees using the Sales Associates form, at Main->Housekeeping->General Setup->Sales Associates. Optional.
- Create Inventory Categories, at Main->Inventory->Inventory Categories. Required.
- Add Vendors, at Main->Inventory->Vendors. Required.
- Add Color/Size/Width charts for matrixes, at Main->Inventory. Optional
- Add Markdown codes (optional) at Main->Inventory->Mark down codes. Optional.
- Enter your tax rate(s) on the Taxes form, at Main->Housekeeping->Accounting Setup->Taxes. Required.
- Select your accounting method in GL Account Setup, at Main->Housekeeping->Accounting Setup->GL Account Setup. Required.
- Add Retail Inventory, at Main->Inventory->Inventory. Required.
- Setup Security, at Main->Housekeeping->General Setup->Security Groups Permissions. Optional.
- Enter your sales contract to print on receipts in Document Terms, located at Main->Housekeeping->General Setup->Document Terms. Required.
- Select your printers at Main->Housekeeping->General Setup->Printers. Required.
- Customize Letters, Tag, Mailing Labels at Main->Housekeeping->Letters, Tags, Mailing Labels. Optional.
- Add existing events, customers and ticket balances via Main-> Events Required. Review the manual’s topic: Existing Customer for a detail explanation. Required
Things to consider & organize BEFORE entering your Retail Inventory:
- Decide on the inventory categories and sub-categories you will use. Categories are used to group sales & inventory data. Example categories would be WG=Wedding Gowns, BM = Bridesmaid gowns, FG = Flowergirls, HP = Headpieces .. etc
- You’ll need a list of all your vendors. Assign an alphanumeric code for each one to identify them within WINPOS (they can be up to 9 characters long but we recommend keeping them short)
- Determine the method your store will use to assign the style codes to inventory items. Choices are to let the computer assign a serial number (most popular choice) or for you to create a code each time you add a new style. (Codes must be unique for each style). Review the inventory Chapter in the online Help for more information. To get started you may use the same codes on your current price tags. Using the existing codes allows you to continue using those tags & they will NOT have to be re-created
- Color & size of your stock piece(s)
- Review each accounting class (describe in the online manual). Like categories these help organized inventory on ACCOUNTING type reports and are assigned to inventory styles. Usually the accounting classes are named the same as the category and matches your inventory sales categories/departments. On each accounting class you also:
- Indicate which items you will allow direct price overrides. Most shops DO NOT allow direct price changes, they prefer to force sales people to perform MARKDOWNS.
- Is sales tax calculate for the style when sold
- Is a sales commission paid to a sales associate when sold
- Finally you must gather the information WINPOS needs to compute the retail price. Data required are the retail factor % (markup, 200% retail factor = keystone), actual paid cost of item & reorder cost to purchase new. The minimum information you need for adding a new inventory style to the inventory system is: Store style/code, vendor style, vendor, category, accounting class (usually same as category), reorder cost & retail price. Additionally size, color actual cost of item (if in stock)
Required Required if Style is in Stock Optional,but nice to have - Store style/code
- vendor style
- vendor
- category
- accounting class (usually same as category)
- reorder cost
- retail price
- size
- color
- actual cost of item (if in stock)
- Description
- If you have .JPG type images on your local computer that you want to add to inventory, you can do it as follows. This assumes your images are in your Pictures folder on your local computer.
- Open up the RDP program and before you log on to the ASP server click the “Local Resources” tab and under “Local drives and resources” section click the “More” button and make sure “Drives” is checked.
- In the ProfitSystem, on the Images tab of Inventory, click Add Images
- In the dialog that pops up, click the Network button.
- Then, click \\tsclient\c.
- If you are using Win 7 or Win 8 navigate to \\tsclient\c\Users\[windows username]\Pictures or My Pictures
- If you are using XP, the folder is \\tsclient\c\documents and settings\[windows username]\Pictures or My Pictures
- The file should be there, select it and it will be imported.
Enter Existing Events and Members and the balance each member owes:
Concepts: there is an event file created that holds the event details. Each event has customers assigned (members). Finally each customer/member will have sales tickets that have transactions and maintains the tickeet balance. The order of entry would be: Event->Add Event (enter event details) -> Member Tab (input member names)-> Create Ticket for each member.
The Create Ticket function creates a ticket (a financial ledger where sales & payments are entered). You have a choice to make for existing members (customers). Either enter in all past transactions, i.e. sales, payments, markdowns OR enter in just the balance they owe the shop (fastest option). Review the online HELP for additional information.
Enter existing customers:
For existing customers you have a paper trail of information that is entered into paper files. You may enter ALL this info into the computer or just enter the minimum and refer back to the paper (most popular). THIS IS JUST FOR EXISTING CUSTOMERS. New customers should have ALL of their info entered into the WinPOS system.
The information you will need to have to begin entering your current Events is:
- the event type (wedding, Prom, Social)
- event name (usually the bride’s name and/or the groom’s name)
- event date
- Bride’s name
- phone numbers
- member role & member name and balance owed.
Next it is necessary to decide how the customer balances will be entered into WinPOS.
We recommend using the Balance Forward and Tax Forward method.
This method requires the total customer balance due and breaks it down into two numbers,
- a taxes portion
- and non-taxes portion
The method allows balances to be entered quickly using only two transactions per customer. Also Events, Customers & inventory may be enter concurrently. Refer to the ProfitSystem online Help or Printed Manual for more detail within the Getting Started Chapter.
