SAVING EXCEL & PDF FILES TO YOUR LOCAL HARD DRIVE FROM WinPOS ON-LINE
WinPOS On-Line users may now choose to export the contents of any of the built-in Reports to a Microsoft Excel file or as an Adobe Acrobat (PFD) file. To do this, you must first make a change to the settings in your Remote Desktop Connection program. Please perform these steps:
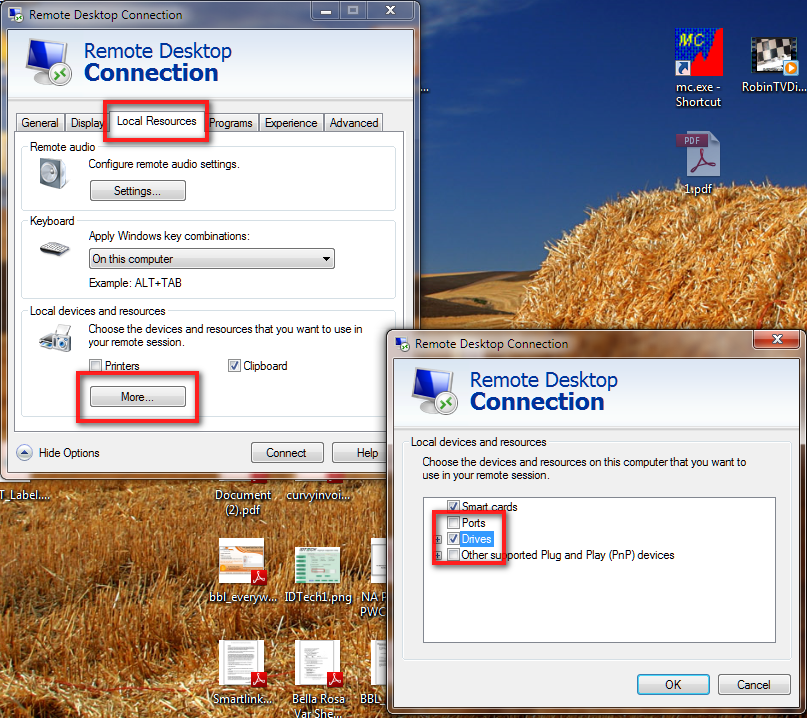
1. Open your Remote Desktop Connection program.
2. Click on the "Options" button at the bottom of the window. The program window will expand.
3. Click on the "Local Resources" tab at the top.
4. At the bottom, there is a section labeled "Local devices and resources". Click the "More" button in that section.
5. In the window that appears, check the box labeled "Drives", then click the "OK" button.
6. Back on the main window, click the "General" tab at the top.
7. Click on the "Save" button at the bottom to save the changes.
8. Click on the "Connect" button to log into WinPOS On-Line.
Performing the above steps will allow you to select your own computer's hard drive as the location for saving any Excel or PFD files you choose to export to. Here's how it works:
1. Run any of the built-in reports in the program (Note: Exporting custom reports created using the built-in Query Maker is not supported at this time). When you do, you will receive the standard "Please Select an Output Destination" requester.
2. Click the button next to either "Excel" or "PDF".
3. Click the file requester button […].
4. Using the File Requester that appears, first select "Computer" on the left. Then, select a location on your own computer's hard drive. Do not select the one called "Local Disk (C:)", because that is OUR hard drive. Rather, you want to click on YOUR hard drive. The name of your drive will contain the name of your computer preceded with the letter "C". For example, if the name of your computer is "Jeff-PC", then the icon you want to select will be called "C on Jeff-PC". Double-click on your C drive icon, select a subfolder to save the file to, then type the name you wish to give the saved file into the "File name" field. Click on the OK button. Then, click the OK button on the Output Requester. Wait for a few seconds. When the file is saved, a window will appear telling you the file has been created in the location you specified on your own hard drive.